A Beginner's Guide to Git
git is
currently one of the most popular
DVCS (Distributed Version Control Systems)
in use. Created by
Linus Torvalds, known as the "father of Linux," in 2005,
git not only offers powerful features but also embodies a
spirit of resilience and independence. Its history reflects the humor
and defiance of master developers and open-source advocates, something
that has always impressed me deeply.
Below is a quote from the Chinese version of Wikipedia that describes the backstory (original source here; English version here):
In 2002, Linus Torvalds decided to use BitKeeper as the main version control system for maintaining Linux kernel code. Since BitKeeper was proprietary software, this decision was long criticized within the community. Particularly, Richard Stallman and members of the Free Software Foundation argued that an open-source tool should be used for the Linux kernel's version control. Linus considered using existing solutions like Monotone, but these tools had various issues, particularly with performance. Other systems like CVS were dismissed by Linus for their architecture.
In 2005, Andrew Tridgell wrote a simple program that could connect to BitKeeper repositories. Larry McVoy, the owner of BitKeeper, believed that Tridgell had reverse-engineered the protocol used by BitKeeper and decided to withdraw the free usage rights of BitKeeper. Negotiations between the Linux kernel development team and BitMover failed to resolve the differences. As a result, Linus decided to create his own version control system to replace BitKeeper, and in just ten days, he developed the first version of git.
git has since become more than just a version control
tool for programmers; it's widely adopted and now serves as an
essential collaboration tool for many projects. Whether it's gathering
data or writing articles, git offers a highly valuable
skill for both work and daily life.
This article follows my usual tutorial style, aiming to provide a quick introduction. For those who want to dive deeper, I highly recommend referring to the official documentation. Here are some useful resources:
Popular git hosting platforms:
Now, let's dive into the content. I hope this guide will be helpful, and feel free to email me if you spot any errors.
Table of Contents
- Step 1: Creating or Cloning a Repository
- Step 2: Setting Your Identity
- Step 3: Recording Changes
- Step 4: Viewing History and Changes
- Step 5: Reverting Changes
- Step 6: Managing Remote Repositories
- Conclusion
Step 1: Creating or Cloning a Repository
Before using git, we first need to create or clone a
git repository (hereinafter referred to as
repo). There are two ways to set up a repo:
-
Create a local repository: Start from scratch by
initializing a new
repolocally. -
Clone an existing repository: Clone an existing
repofrom a remote service to your local machine.
Creating a Local Repository
Creating a repo locally is straightforward. First,
navigate to the directory where you want to initialize the
repo:
$ cd /my/git/repo
Then, use the git init command to initialize the
repository:
$ git init
After running this command, a hidden .git directory will
be created within the specified folder. This
.git directory contains all the internal data and version
control information that git needs. Generally, you do not
need to manually modify anything inside .git, as
git commands will handle everything for you.
Cloning an Existing Repository
If you want to use an already existing repo, you can
clone it from a remote service. First, navigate to the local directory
where you want the cloned repository to reside, then execute:
$ git clone <url>
This command will download all the contents of the remote
repo, including its full commit history, and will
automatically set up the remote reference (which we will
discuss later).
With your repo set up, you are now ready to explore
git and begin your version control journey!
Step 2: Setting Your Identity
Before using git, the first thing we need to do is
configure our personal identity, specifically our
name and email address. This
information is essential for version control, as it allows
collaborators to identify who made each commit. It also ensures that
your contributions are properly attributed, which can be particularly
rewarding when working on open-source projects.
Beyond identification, setting up your personal identity correctly can
prevent future issues. In large projects or shared repositories,
modifying user information retroactively can be cumbersome.
Personally, I learned this the hard way. When I first started using
git, I was unaware of this setting, and all my commits
were recorded under my computer's default username. Seeing that in my
git log was frustrating, to say the least. To avoid such
issues, it is best to set up your identity correctly from the start.
To configure your global identity (applicable across all
git repositories), use the following commands:
$ git config --global user.name "Your Name"
$ git config --global user.email "your-email@example.com"
If you need to override these settings for a specific
repo without affecting the global configuration, you can
use the --local option instead:
$ git config --local user.name "Your Name"
$ git config --local user.email "your-email@example.com"
To explore additional configuration options, refer to the manual:
$ man git config
You can also verify your current configuration by running:
$ git config -l
Once your identity is correctly set up, you are ready to move forward
and start using git effectively!
Step 3: Recording Changes
Now, we are diving into the core functionality of git:
tracking and recording changes. As a version control system (VCS),
git's primary purpose is to monitor file modifications
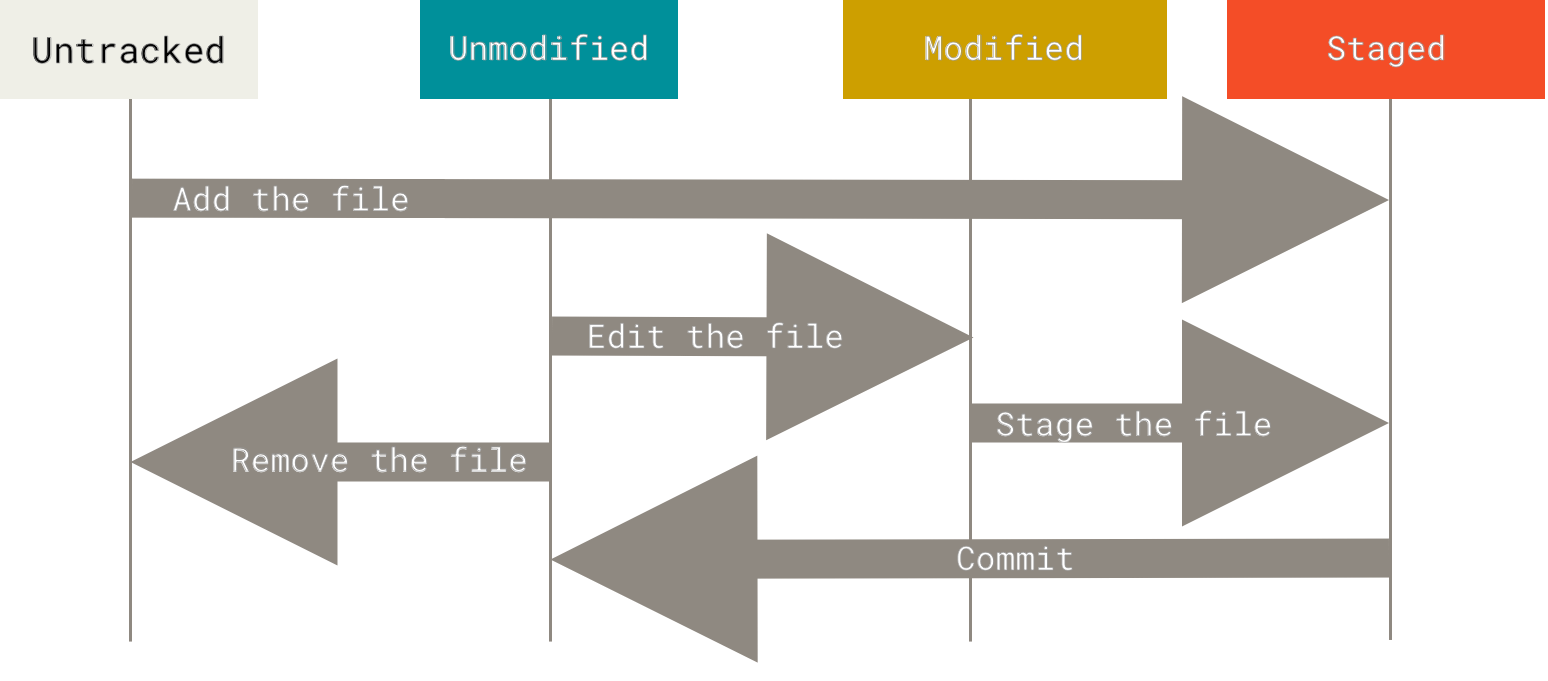
efficiently. In git, files exist in one of two primary
states:
-
tracked: Files thatgitis actively monitoring. These can be further classified intounmodified,modified, andstaged. -
untracked: Files thatgithas not yet been instructed to track.
The following diagram from the official Git documentation illustrates how files transition between different states:
Checking File Status
To check the current status of files in a repo, use:
$ git status
This command will show which files are untracked,
modified, or staged. Keeping an eye on file
status is essential for managing changes efficiently.
For a deeper understanding of how git works, refer to the
official Git book. This
guide, however, focuses on getting you started quickly.
Tracking New Files
If we create a new file, such as README, inside a
repo:
$ touch README
At this point, the file is in an untracked state. To tell
git to start tracking it, run:
$ git add README
This moves the file to the staged state, meaning it is
ready for the next commit.
Committing Changes
Once a file is staged, we can commit it to the repo:
$ git commit
Executing this command opens the default editor, allowing
us to enter a commit message that describes the changes. This helps
keep a clear history of modifications. After committing, the file
moves to the unmodified state.
A standard commit workflow looks like this:
$ git add <file>  # Stage changes
$ git commit      # Commit changes
Simplifying the Commit Process
To streamline the process, we can use the following command to stage and commit all changes at once:
$ git add -A  # Stage all changed files (equivalent to --all)
$ git commit -m "Brief description of changes"  # Add commit message inline
With this, we have successfully completed the fundamental process of
recording changes in git, which is one of the most
frequently used operations in version control.
Step 4: Viewing History and Changes
As we start using git for version control, we will often
need to review past changes. The git status command
(introduced earlier) only displays the current state of the working
directory, but to view the complete modification history, we use:
$ git log
This command lists all commit records, including the
commit hash, author, date, and commit message. You might
notice that each commit has a unique hash value, which
serves as its identifier. If we ever need to revert to a specific
point in time, we can use this hash to do so.
Besides reviewing commit history, we may also need to
inspect the exact modifications made to files rather than just knowing
which files were changed. This is where the
git diff command becomes useful.
Viewing Unstaged Changes
To check modifications that have been made but not yet added to the staging area, use:
$ git diff
This command will display the specific changes, marking additions with
+ and deletions with -, making it easier to
identify modifications.
If you prefer to view changes word-by-word instead of by full lines, you can use:
$ git diff --word-diff
This highlights deletions as [-removed content-] and
additions as {+new content+}, providing a more detailed
comparison.
For even finer control over the diff format, you can use:
$ git diff --word-diff-regex=.
This treats each character as a separate comparison unit, which can be particularly useful for detecting changes in languages like Chinese, where a single character can be meaningful.
Viewing Staged Changes
If files have already been added to the staging area (git add), but have not yet been committed, we can inspect these changes
using:
$ git diff --staged
This works similarly to git diff, but specifically shows
the modifications that are currently staged for the next commit.
Comparing Two Commits
To compare the differences between two specific
commit points, we use:
$ git diff <commit-hash-1> <commit-hash-2>
This command highlights all modifications between the two commits, allowing us to track the evolution of the code over time.
These git diff commands are essential for version
management, helping us understand exactly what has changed and
ensuring smooth collaboration in a project.
Step 5: Reverting Changes
In addition to viewing history and inspecting modifications, we often
need to undo changes. Reverting a repo to a previous
commit is a common operation in git. We can
achieve this using the following command:
$ git reset <commit-hash>
This command adjusts the state of git, but it does not
necessarily affect the actual files. For example, if a file was
untracked before the specified commit, it will remain
untracked after the reset, meaning the file itself will
not be deleted but will instead be moved back to an
unstaged state.
--soft Option: Keep Changes
If we want to move back to a previous commit but keep all
modifications in the staged state, we can use:
$ git reset --soft <commit-hash>
This allows us to keep all changes ready for a new commit while removing the commit history beyond the specified commit.
--hard Option: Fully Restore to a Commit
If we want to completely discard all changes after a certain commit (including both staged and unstaged modifications), we can use:
$ git reset --hard <commit-hash>
This forces git to restore the repo to the
exact state of the specified commit, deleting all subsequent changes.
Since this operation is irreversible,
it should be used with caution to avoid losing
important work.
Choosing the right git reset mode depends on the
situation. If we want to undo a commit but keep our changes,
--soft is the best choice. If we are certain we need to
remove all changes beyond a specific commit,
--hard provides the cleanest reset.
Step 6: Managing Remote Repositories
In git, managing remote repositories (often
referred to as remote) is essential for collaboration and
code backup. We frequently need to push local changes to
a remote repository or pull updates from it to stay in
sync with teammates.
Connecting to an Existing Remote Repository
If we already have a remote repository, we first need to link it to
our local repo. We can do this using:
$ git remote add origin <URL>  # "origin" is a commonly used alias for the remote repository
$ git remote -v  # Verify remote repository links
Once linked, we can pull the latest version of the repository:
$ git pull origin master # "origin" is the remote name, "master" is the branch name
Some may wonder how this differs from git clone. The key
difference is that git clone simply copies a repository,
while git remote establishes a persistent connection
between the local and remote repositories, enabling synchronization.
Once local changes are made, they can be pushed to the remote repository:
$ git push origin master
Force Pull from a Remote Repository and Overwrite Local Changes
If our local repository conflicts with the remote version, we may need to forcefully update our local repository to match the remote repository. This can be done with the following commands (use with caution, as it will overwrite local changes):
$ git fetch --all
$ git reset --hard origin/master
$ git pull origin master
This ensures that our local repo is fully synced with the
remote version.
Pushing an Existing Local Repository to a Remote Repository
If we already have a local repo and want to upload it to
a newly created remote repository, we need to first add the remote
link:
$ git remote add origin <URL>
$ git add .
$ git commit -m "Initial commit"
$ git push origin master
Since git push is a frequently used command, we can use
the -u parameter to set the default
remote and branch for future operations for
convenience:
$ git push -u origin master
After this setup, we only need to run:
$ git push
to push local changes, making the workflow much more efficient.
Conclusion
Congratulations! This article has now come to an end. We have covered
the fundamental usage of git, and I hope that after
reading this guide, you can quickly get started with version control.
However, the journey of learning git is far from over.
Even if you fully grasp everything discussed here, it is just the
first step.
Like many Unix-like tools, mastering
git requires continuous learning and hands-on practice to
truly understand its power and flexibility. If you want to explore
more advanced operations, be sure to check out my
"An Advanced Guide to Git: Practical Tips and Best
Practices".
Wishing you smooth sailing on your git learning journey!